Battery switch on travel trailer function is crucial for managing your RV’s power. This guide will walk you through understanding how these switches work, from their basic operation to advanced troubleshooting. We’ll cover different switch types, safe connection procedures, and essential maintenance tips to keep your travel trailer’s electrical system running smoothly. Get ready to become a battery switch expert!
We’ll explore the various types of batteries compatible with your travel trailer and how to correctly connect and disconnect them using your battery switch. Safety is paramount, so we’ll delve into the necessary precautions to avoid potential hazards and ensure the longevity of your battery system and electrical components. We’ll also troubleshoot common issues and offer preventative maintenance strategies to keep your system humming along.
Understanding Battery Switch Functionality in Travel Trailers
A battery switch is a crucial component in a travel trailer’s electrical system, allowing you to manage and control the flow of power from your batteries to the various appliances and systems within your RV. Understanding its function and operation is essential for safe and efficient use of your trailer.Battery switches serve to isolate batteries from the trailer’s electrical system, preventing accidental drain and protecting your batteries from damage.
They also enable you to switch between different battery banks (if your setup includes multiple batteries) and to connect to shore power without affecting your house batteries.
Types of Battery Switches
Several types of battery switches cater to different needs and setups. The most common are single switches, dual switches, and more complex multi-bank systems. Single switches control a single battery, often used in smaller trailers with one battery. Dual switches manage two batteries, commonly a house battery and a starting battery for the tow vehicle. Multi-bank switches handle more than two batteries, allowing for more complex configurations and greater power capacity.
The choice depends on the size and complexity of your trailer’s electrical system.
Internal Workings of a Battery Switch
A typical battery switch, whether single or dual, uses a rotary mechanism to connect or disconnect the battery terminals. The switch contains several contact points that align when rotated to the desired position (e.g., “Off,” “Battery,” “Both,” “Shore”). These contacts are robustly built to handle the high current demands of the trailer’s electrical system. Internally, there are often several heavy-duty wires connected to the battery terminals and the switch itself.
These connections are designed to minimize resistance and prevent overheating.
Installing a Battery Switch
Installing a battery switch requires some basic electrical knowledge and tools. Always disconnect the battery’s negative terminal before starting any work. A step-by-step guide is as follows:
1. Choose the appropriate location
Select a location that’s easily accessible but protected from the elements.
2. Mount the switch
Securely mount the switch to a suitable surface using appropriate screws and hardware.
3. Connect the battery cables
Connect the positive (+) cables from your battery(ies) to the appropriate terminals on the switch. Use heavy-gauge wire suitable for the current rating of the switch.
4. Connect the load cables
Connect the positive (+) cables that supply power to the trailer’s electrical system to the output terminals on the switch. Again, use heavy-gauge wire appropriate for the current draw.
5. Connect the ground (negative) cables
So, you’re an audiophile who loves to travel? Awesome! Make sure you check out this guide on audiophile travel setups to keep your ears happy on the go. It’s crucial to protect your investment, and while you’re planning your trip, don’t forget about travel insurance! Consider getting a quote from Aon travel insurance for peace of mind.
That way, you can relax and enjoy your amazing music and adventures!
Connect the negative (-) cables from your battery(ies) directly to the chassis or a designated ground point. Avoid connecting the negative cables through the switch.
6. Test the switch
After making all connections, carefully test the switch in each position to ensure proper operation. Verify that power flows correctly to the intended circuits when the switch is in the appropriate position.
Always consult a qualified electrician if you are unsure about any aspect of this process. Incorrect wiring can lead to serious damage or injury.
Connecting and Disconnecting Batteries
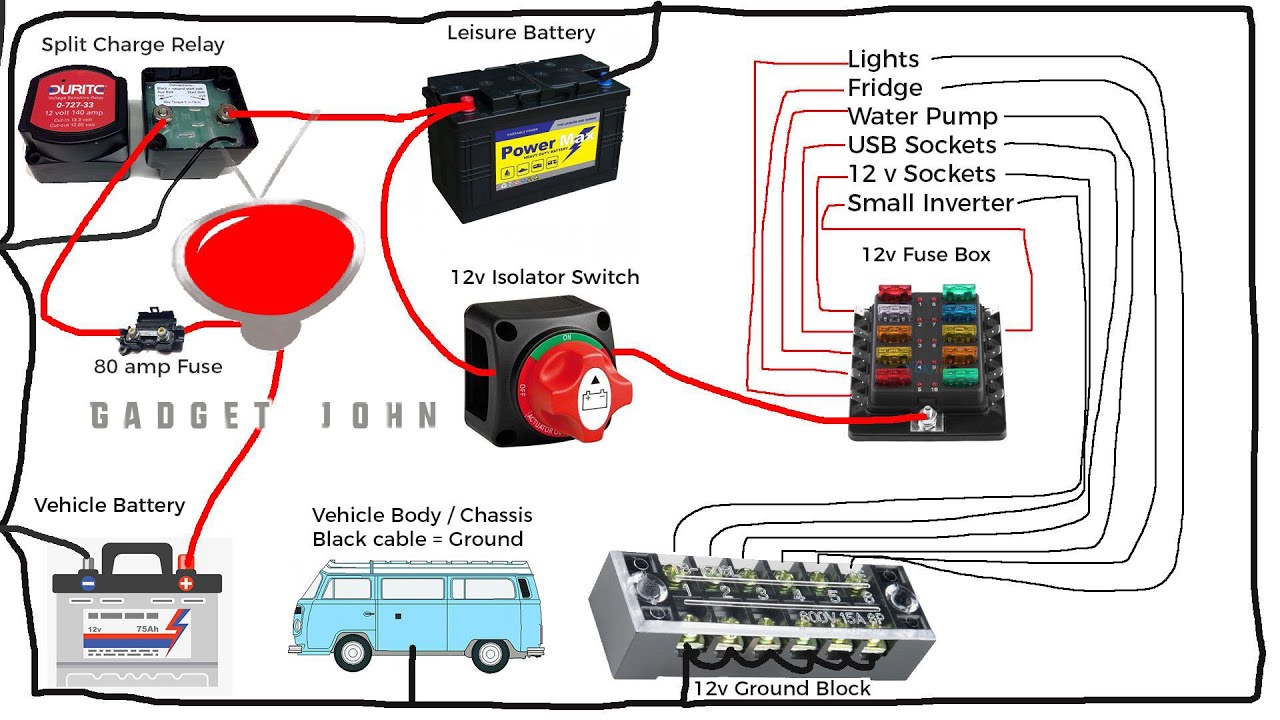
Properly connecting and disconnecting your travel trailer’s house battery to the main power supply is crucial for safe and reliable operation. Incorrect connections can lead to serious damage to your electrical system, or even pose a fire hazard. Always prioritize safety when working with batteries.
Connecting and disconnecting your house battery involves using a battery switch, a device designed to isolate the battery from the trailer’s electrical system. This allows you to easily turn power on or off to the house battery, preventing accidental discharge and protecting your appliances. The process is generally straightforward, but following the correct steps and safety precautions is essential.
Safety Precautions When Working with Batteries, Battery switch on travel trailer function
Working with batteries requires caution due to the potential for sparks, acid spills, and explosions. Always wear appropriate safety glasses to protect your eyes from splashes of battery acid. Acid burns can be extremely painful and require immediate medical attention. Additionally, ensure adequate ventilation as battery gases are flammable and can be harmful if inhaled. Never smoke near batteries, and avoid wearing loose clothing or jewelry that could accidentally contact the battery terminals.
If you’re unsure about any aspect of the process, consult a qualified RV technician.
Consequences of Incorrect Battery Connections
Connecting the battery incorrectly can lead to a variety of problems, ranging from minor inconveniences to significant damage. A reversed connection can cause sparks, potentially igniting flammable materials nearby. This could lead to a fire, resulting in damage to your trailer, and potentially injury or even death. Incorrect connections can also damage sensitive electronic components in your trailer, requiring expensive repairs or replacements.
Moreover, a faulty connection might lead to a complete loss of power, leaving you stranded without lights, appliances, or other essential systems.
Connecting and Disconnecting Batteries Using a Battery Switch
The following table Artikels the steps for safely connecting and disconnecting your batteries using a typical battery switch. Remember to always consult your specific RV’s manual for detailed instructions and diagrams.
| Step | Action | Safety Measure | Notes |
|---|---|---|---|
| 1 | Locate the battery switch. It’s usually found near the batteries themselves. | Ensure the area is well-ventilated. | Some switches are labeled clearly; others may require tracing wires. |
| 2 | Identify the “ON” and “OFF” positions of the switch. | Double-check the switch labeling. | Some switches use a different system (e.g., a rotary dial). |
| 3 | To connect the battery, turn the switch to the “ON” position. | Observe for any sparks or unusual sounds. | This connects the house battery to the trailer’s electrical system. |
| 4 | To disconnect the battery, turn the switch to the “OFF” position. | Confirm the switch is firmly in the “OFF” position. | This isolates the house battery, preventing discharge and protecting appliances. |
Types of Batteries Used in Travel Trailers and Their Compatibility
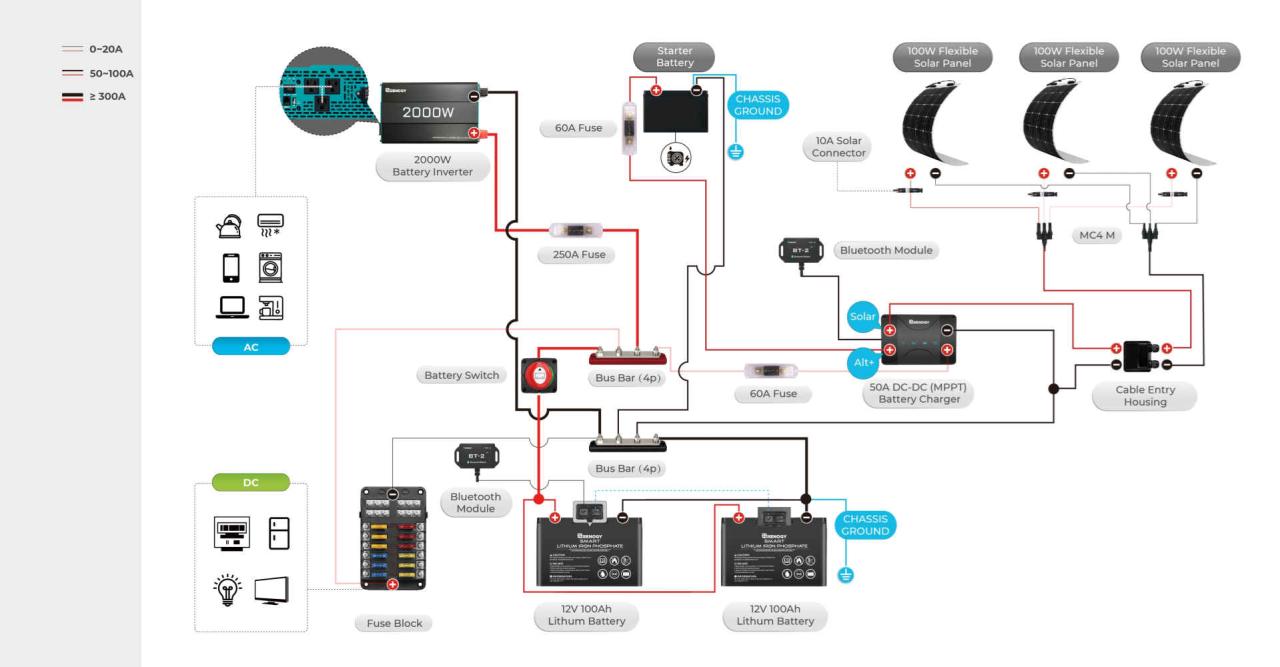
Choosing the right battery for your travel trailer is crucial for reliable power. Different battery types offer varying performance characteristics, lifespans, and compatibility with your battery switch. Understanding these differences will help you make an informed decision.
The most common battery types used in travel trailers are lead-acid (flooded, gel, and AGM) and lithium-ion. Each has its own strengths and weaknesses, affecting both your trailer’s operation and the longevity of your battery switch.
So, you’re an audiophile who travels? Awesome! Check out this guide on creating the perfect audiophile travel setup to ensure your ears are happy on the go. And speaking of travel, don’t forget to sort out your insurance! Getting Aon travel insurance is a smart move; peace of mind is priceless, especially when you’re carrying around expensive headphones!
Lead-Acid Battery Types and Compatibility
Lead-acid batteries are a traditional choice, offering a relatively low initial cost. However, they are heavier and require more maintenance than lithium batteries. There are three main types: flooded, gel, and AGM (Absorbent Glass Mat). Flooded lead-acid batteries require regular checking and topping off of electrolyte levels. Gel and AGM batteries are sealed and maintenance-free, but they still have a shorter lifespan and lower energy density compared to lithium.
All types of lead-acid batteries are generally compatible with most standard battery switches, though using a switch designed for the higher current draw of larger battery banks is advisable. The higher discharge current of lead-acid batteries, especially when deeply discharged, can place stress on the switch’s contacts over time.
Lithium-Ion Battery Types and Compatibility
Lithium-ion batteries are becoming increasingly popular due to their higher energy density, longer lifespan, lighter weight, and faster charging times. They are significantly more expensive upfront but offer long-term cost savings due to their extended lifespan. However, some battery switches may not be compatible with the higher voltage and different charging characteristics of lithium-ion batteries. Always check the compatibility of your chosen lithium battery with your battery switch before installation.
Using an incompatible switch can lead to premature failure of the switch or even damage to the battery. Lithium batteries generally have a lower discharge current, which can be gentler on the battery switch contacts.
Impact of Battery Type on Battery Switch Lifespan and Performance
The type of battery significantly impacts the lifespan and performance of your battery switch. Lead-acid batteries, especially flooded types, can produce higher surge currents, especially during starting or high-power demands. This can cause increased wear and tear on the switch’s contacts, potentially shortening its lifespan. Conversely, lithium batteries tend to be gentler on the switch due to their more controlled discharge characteristics.
However, the higher voltage of lithium batteries might require a switch specifically designed for that voltage to avoid potential damage. Using a switch rated for higher amperage than your battery bank’s maximum discharge current is always a good safety practice.
Comparison of Battery Types for Travel Trailers
| Battery Type | Pros | Cons | Switch Compatibility |
|---|---|---|---|
| Flooded Lead-Acid | Low initial cost | Heavy, requires maintenance, short lifespan, lower energy density | Generally compatible, but higher current draw may stress the switch |
| Gel Lead-Acid | Sealed, maintenance-free | Heavier than AGM and Lithium, shorter lifespan than AGM and Lithium, lower energy density | Generally compatible, but higher current draw may stress the switch |
| AGM Lead-Acid | Sealed, maintenance-free, better vibration resistance than flooded or gel | Heavier than Lithium, shorter lifespan than Lithium, lower energy density | Generally compatible, but higher current draw may stress the switch |
| Lithium-ion | Lightweight, long lifespan, high energy density, fast charging | High initial cost, potential compatibility issues with some switches | Check compatibility before purchase; some switches may require modification or replacement |
Safety Considerations and Best Practices
Working with a travel trailer’s battery system requires caution. Improper handling can lead to serious injury from electric shock, burns, or explosions. Understanding and following safety procedures is paramount for a safe and enjoyable camping experience.Proper use of the battery switch is crucial for preventing accidents. This includes understanding its function, correctly connecting and disconnecting batteries, and knowing what to do in case of a malfunction.
Neglecting safety precautions can lead to significant damage to your equipment and, more importantly, personal injury.
Potential Hazards Associated with Improper Battery Switch Use
Improper use of the battery switch can result in several dangerous situations. For instance, accidentally leaving the switch in the “on” position while disconnected from shore power can drain your batteries completely, leaving you without power for essential appliances like lights and refrigeration. More seriously, incorrectly connecting or disconnecting the batteries can cause sparks, leading to potential fires, especially in the presence of flammable materials often found in travel trailers.
Furthermore, touching exposed terminals while the switch is on can result in a severe electric shock.
Emergency Procedures for Battery Switch Malfunctions
In the event of a battery switch malfunction, the first step is to immediately disconnect the batteries using the switch if possible, or by disconnecting the battery cables directly at the terminals. This isolates the system and prevents further issues. If you suspect a short circuit, do not attempt to repair it yourself. Instead, contact a qualified RV technician or electrician.
Never attempt to work on the battery system while it is connected to power. If you experience a fire, evacuate the area immediately and call emergency services. Have a fire extinguisher rated for electrical fires readily available and know how to use it.
Safety Precautions When Working with a Travel Trailer’s Battery System
Before working with your travel trailer’s battery system, it’s essential to take several precautions.
- Always wear appropriate safety gear, including safety glasses, gloves, and closed-toe shoes. This protects you from sparks, acid splashes, and potential injuries.
- Ensure the battery switch is turned off before performing any maintenance or connections.
- Never work on the battery system in a confined space without proper ventilation. Battery fumes are toxic and can be lethal in enclosed spaces.
- Have baking soda readily available to neutralize any spilled battery acid. Immediately flush the affected area with copious amounts of water if acid spills on your skin or clothing.
- Inspect battery terminals and cables regularly for corrosion. Clean them with a wire brush and apply a corrosion inhibitor to prevent future corrosion.
- Use insulated tools to prevent accidental shocks.
- Never smoke or use open flames near batteries. Hydrogen gas, a byproduct of battery operation, is highly flammable.
- Consult your travel trailer’s owner’s manual for specific safety instructions related to its battery system.
Mastering your travel trailer’s battery switch is key to a worry-free RV experience. By understanding its function, implementing safe practices, and performing regular maintenance, you’ll ensure reliable power for all your adventures. Remember, proper battery management prolongs battery life and prevents costly repairs. So, keep your battery switch in tip-top shape, and happy travels!
Quick FAQs: Battery Switch On Travel Trailer Function
What happens if I leave my battery switch on all the time?
Leaving the switch on constantly can drain your battery, especially if there’s a parasitic draw from an appliance. It’s best to turn it off when not using the trailer.
Can I use any type of battery with my travel trailer’s battery switch?
Not necessarily. Some switches are designed for specific battery types (e.g., lead-acid vs. lithium). Check your switch’s specifications and your battery’s compatibility before connecting them.
My battery switch is making clicking noises. What’s wrong?
Clicking often indicates a faulty switch or a low battery. Check your battery voltage and consider replacing the switch if the problem persists.
How often should I clean my battery switch terminals?
Clean your battery terminals and switch contacts at least twice a year, or more often if you notice corrosion or poor connections.
